How To Cut Chair Rail Inside Corners - Chair Rail Corner (Bronze) : Cut them at a 45 deg.. It should be standing on edge with the profile facing away from the fence. The process is simple, a clean 45° back cut, a steady hand, a stabile work surface and a sharp coping saw blade. Cut the chair rail end to the specified angle. Divide the reading by 2 to get the correct angles for each cut. At your miter saw, mark the molding for your first piece (image 1).
Cut the chair rail end to the specified angle. The addition of chair rail molding is an easy and fairly inexpensive way to dress up a room. This is called returning the. Using a miter saw, cutting from an angle, from inside corners, and installing them, you will know the steps and information you need to cut chair rail corners. At your miter saw, mark the molding for your first piece (image 1).
Corner Block Store from www.cornerblockstore.com For example, if the corner is 86 degrees, each of your cuts will be 43 degrees. Decide exactly how high you want your chair rail to be on the wall and then mark that point all the way around the room. Clamp a 1×4 to the fence so the saw blade won't mangle the return. An inside corner will be cut differently than the outside corner. The inside corner cuts on your chair rail must be made different than the outside corner cuts. Cut the chair rail end to the specified angle. Angle like you would base board. Saw through the edge of the chair rail.
This is called returning the.
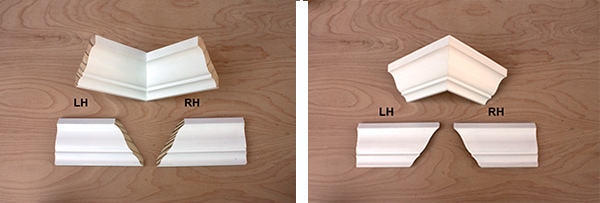
Cut them at a 45 deg. Starting next to the doorway (this piece will have a straight cut), use a level to make sure your trim is even. Unfortunately, at the end of the day, we did not have any extra pieces to use for mitering and didn't want to wait 3 weeks to get it in, which would have thrown off the timing of the whole project. Saw through the edge of the chair rail. Make any corner outer cuts so the chair rail with an angle goes past the corner. Line up the end of the chair rail with the miter box so that you cut it at a 90 degree angle. At your miter saw, mark the molding for your first piece (image 1). Miter the last piece, and then cut a plug for the mitered end: Where two chair rail pieces meet at an inside corner, one piece is cut square and butted into the wall, while the other piece must be coped to closely fit the intersecting molding's profile (image 3). Hey friends i know how to do inside corners for chair rail that are 90 degree corners.i push the long piece to the corner and the other piece is cut with a coping saw and its looks fine, but my question how i cut an inside corner for chair rail that is a 45 degree angle total? The same techniques work for crown molding and base molding, as well. If you are planning on painting the chair rail, you can get away with mitering the corners and then using a small amount of caulking to fill in any imperfections. Divide the reading by 2 to get the correct angles for each cut.
Always use protective eyewear and gloves when operating a power saw or other tool. Actually, the chair rail you show being cut looks exactly like the kind we bought. Unfortunately, at the end of the day, we did not have any extra pieces to use for mitering and didn't want to wait 3 weeks to get it in, which would have thrown off the timing of the whole project. It's now a great way to add some character to your boring, basic walls. Take a piece of the chair rail and put it into a miter box.
How to cut an inside 90 degree crown molding corner - YouTube from i1.ytimg.com When you cut the return, leave the saw blade down until the blade stops spinning to avoid nicking the return as it falls away from the blade. Make any corner outer cuts so the chair rail with an angle goes past the corner. Use a stud finder and mark off where the studs are so you know where to nail in the trim. Unfortunately, at the end of the day, we did not have any extra pieces to use for mitering and didn't want to wait 3 weeks to get it in, which would have thrown off the timing of the whole project. If you have such a corner, look for an angle measuring device at your hardware store. First, cut a return piece the width of the chair rail. Using a miter saw, cutting from an angle, from inside corners, and installing them, you will know the steps and information you need to cut chair rail corners. Saw through the edge of the chair rail.
Saw through the edge of the chair rail.
You can get bullnose subway tiles finished on the short end or the long end. Use a stud finder and mark off where the studs are so you know where to nail in the trim. Make any corner outer cuts so the chair rail with an angle goes past the corner. You don't need to miter inside corners. Miter the last piece, and then cut a plug for the mitered end: The benny with a coped cut is it hides joint shrinkage way better than other method i've seen or tried. When the stairs are at different levels or where there is a landing, angles are cut on the ends of the chair rail to join them together. The decision to either cope the inside corners or miter them, probably lies in what material you are using and how the chair rail will be finished. Clamp a 1×4 to the fence so the saw blade won't mangle the return. To end chair rail at an archway or corner, form a return an inch from the corner. The addition of chair rail molding is an easy and fairly inexpensive way to dress up a room. At your miter saw, mark the molding for your first piece (image 1). Use your adjustable angle square to measure the angle of inside corners, pressing the tool into the corner and taking the reading.
An inside corner will be cut differently than the outside corner. It should be standing on edge with the profile facing away from the fence. Inside corners require coped joints. Where two chair rail pieces meet at an inside corner, one piece is cut square and butted into the wall, while the other piece must be coped to closely fit the intersecting molding's profile (image 3). You can get bullnose subway tiles finished on the short end or the long end.
Trim Shortcuts for DIY'ers - Page 3 of 3 - Extreme How To from extremehowto.com Always use protective eyewear and gloves when operating a power saw or other tool. How to use a coping saw to cut and cope chair rail molding. Make an inside cut so the chair rail angle goes into the other corner cut. You can cut the angles perfectly each time by trimming down. An inside corner will be cut differently than the outside corner. Place the chair rail molding on a miter saw on the left side of the blade. Using a miter saw, cutting from an angle, from inside corners, and installing them, you will know the steps and information you need to cut chair rail corners. The same techniques work for crown molding and base molding, as well.
Swing the miter saw blade to the left side and.
Angle like you would base board. Starting next to the doorway (this piece will have a straight cut), use a level to make sure your trim is even. If you are planning on painting the chair rail, you can get away with mitering the corners and then using a small amount of caulking to fill in any imperfections. Eric pretty much already answered your q about mitering. You can cut the angles perfectly each time by trimming down. An inside corner will be cut differently than the outside corner. It's now a great way to add some character to your boring, basic walls. Watch as the #verycoolguys of construction show you how to install chair rail, in a proper molding installation.today we show you, step by step, how to insta. Take a piece of the chair rail and put it into a miter box. For example, if the corner is 86 degrees, each of your cuts will be 43 degrees. To end chair rail at an archway or corner, form a return an inch from the corner. It should be standing on edge with the profile facing away from the fence. Miter the last piece, and then cut a plug for the mitered end: